In a full-scale set-up for HyFlex by an event vendor or others, the venue is first set up ideally, and then HDMI distributors and video mixers are used to enable online distribution.
In contrast, the "TUFS-style Simple HyFlex Setting" is not an ideal venue setting, but it is designed for simplicity of operation. Although it has disadvantages in terms of image quality, it is suitable for operation mainly by part-time student workers.
Please refer to the following for information on preparation for the show.
Table of Contents
Schematic of TUFS-style setting
Differences from common settings
General setting
- The presenter's PC will be connected to the venue facilities to display slide materials and other materials for the presentation.
- For Zoom distribution, use an HDMI splitter or similar device to duplicate the video signal and run one side to the venue screen and the other side to the Zoom side.
TUFS-style setting
- The presenter's PC will not be connected to any venue equipment.
- The screen at the venue will display the same Zoom screen that the Zoom audience sees.
- If the presenter wants to show the slides to the audience, he/she can share the screen to Zoom, which will also display them on the audience's screen via Zoom.
Advantages/Disadvantages
Advantages
demerit
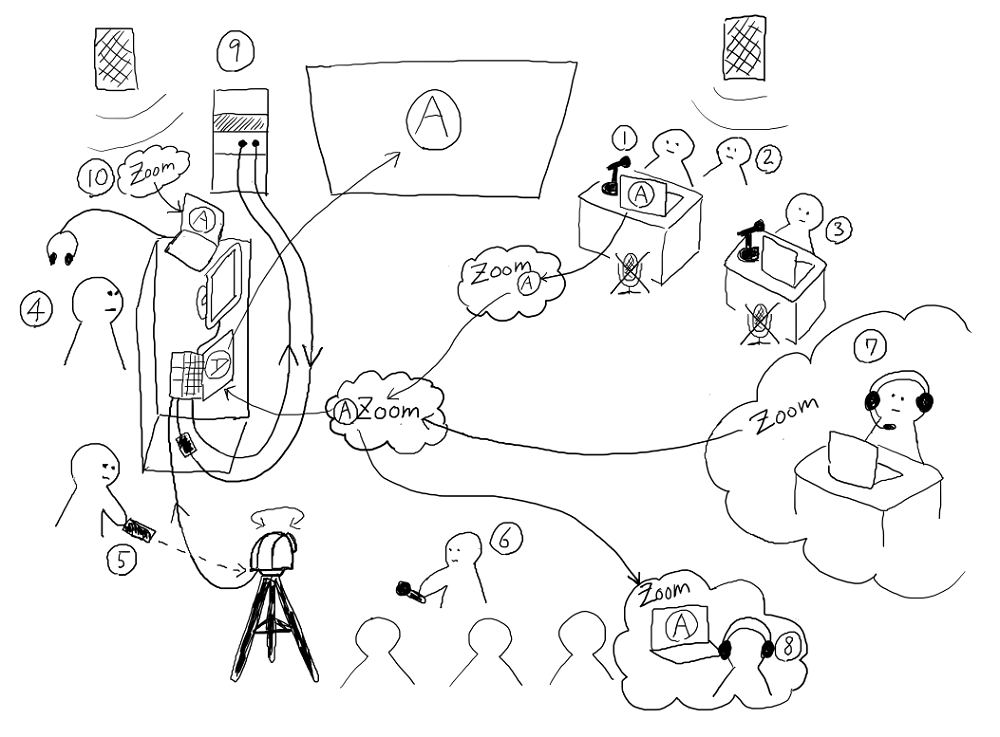
Description of each PC, equipment, and person in charge
(i) Presenter's PC
- No connection to venue equipment.
- Have them connect to the Internet via campus WiFi and enter Zoom for the event.
- The Zoom microphone is always "muted". Note that turning the microphone on will cause feedback!
- Once the presentation has begun, "share the screen" via Zoom. This way, the slides will be displayed to the online audience, which will then be shown on the audience screen as well.
- If you want to play audio, it is possible to stream it to the audience via Zoom, although there will be a time lag. However, you will need to check the "Share Sound" checkbox when you "Share Screen", so don't forget to do so.
- Video playback will be significantly degraded in image quality and movement will be choppy. If video is important, consider a different setting. (However, no matter what the setting, video will be significantly degraded on the online side.)
- Wiring is a little more complicated, but if there is an extra VGA input on the venue system, it is possible to connect the presenter's PC to a VGA connection and switch to VGA input only during video playback, allowing the video to be played back in high quality at the venue only.
(2) Presenter's assistant
- The presenter's PC will "share screen" in the "mute" state, which is usually a misstep, and Zoom may display a message asking the presenter to turn on the microphone. To prevent the presenter from panicking, tell him or her in advance to ignore the message when it appears. (It is also a good idea to put a warning on the PC)
- There are a few tips for "screen sharing" on Zoom. If the presenter is unfamiliar with it, help him or her operate the slide sharing right at the start of the presentation. The trick is to "screen share" an application such as "PowerPoint" rather than the "screen" itself.
- For PowerPoint, some people prefer to use the "Presenter Tools" (Presenter View), which displays notes and elapsed time. By right-clicking on the screen after the PowerPoint screen sharing starts, the option "Show Presenter Tools" will appear. By selecting this option, you can view the "Presenter Tools" on the PC at hand, while normal slides are displayed on the Zoom side/venue. If the presenter is having trouble, take over for him or her.
(iii) Moderator PC
- No connection to venue equipment.
- Have them connect to the Internet via campus WiFi and enter Zoom for the event.
- The Zoom microphone is always "muted". Note that turning the microphone on will cause feedback!
- If necessary, a "standby screen" is displayed before the event starts, and a "program progression chart" is displayed when the moderator is in the middle of the event.
- These can also be displayed by the person in charge of the "Host PC for Zoom delivery". It is recommended that the host PC be displayed by the moderator, since there are many operations to be performed, but the roles should be divided as needed.
4) Host PC for Zoom distribution
- By connecting to the venue's sound system, the "audio" from the venue microphones, including wired and wireless microphones, is aggregated and becomes the microphone input for the host PC. All audio from the presenter, moderator, audience questions, etc., will be played back by the host PC to the Zoom side.
- The host PC is connected to the venue system via an HDMI cable. The venue screen should be set to "duplicate mode" with the main display of the host PC.
- Connect an external display, separate from the main display, via VGA. (The host PC should have both HDMI and VGA outputs built in.) Since what is on the main display will be visible to the entire audience, operations that you do not want or need to show to the audience, such as chatting during the event, should be performed on the sub-display. (See "Sub-displays" on page 3 for more information.
(5) PTZ camera (or ceiling camera at the venue)
- PTZ cameras can be pointed at any angle, zoomed in/out, etc., by remote control. Send a realistic image to the Zoom side by showing the person who is speaking at the moment, such as the moderator, presenter, or audience member who is asking a question.
- Many PTZ cameras have a "preset position" feature. By storing the camera angle for the presenter, the camera angle for the moderator, etc., in advance, it is possible to switch scenes smoothly.
- Since it is difficult for a single person to operate both the host PC and the PTZ camera, it is recommended to assign a separate person to each.
6) Microphone operator
- Hand the microphone to the questioner during the Q&A session.
- The online side will not hear anything except what is said through the microphone.The audience can hear you in your own voice without a microphone, but make sure to use a microphone for all questions and remarks so that the online side can hear you as well.
- The microphone operator will be on standby except for the Q&A session, so it is recommended that the microphone operator also serve as the presenter's assistant in (2).
(7) Online presenters
- Just as in a regular Zoom meeting, if you speak or share your screen, it will be communicated to the audience.
- It is simpler than presenting at a venue, so there is no need to worry if a presenter who was scheduled to present in person is suddenly online.
(viii) Online viewers
- As with a normal Zoom meeting, there are no special points to note.
(ix) Venue facilities (audio/visual system)
- Put the HDMI output of the host PC into the input of the venue system.
- The output of the venue system is often an HDMI output if there is a ceiling camera. Since it is not possible to capture the video on the host PC as it is, an "HDMI Capture" should be used. Both audio and video can be captured and sent to Zoom.
- If there is no ceiling camera, use the "REC OUT" or "AUX OUT" of the venue's sound system, often with RCA cables, but sometimes with other cables. Since the host PC cannot capture the audio as it is, use an "audio capture" device. You can capture the audio and send it to Zoom. If you do not have a ceiling camera, use a separate PTZ camera on a tripod to capture video.
10) PC for monitoring
- During a HyFlex event, you may be asking yourself, "Can I hear you properly on the online side? Can I see you?" It is recommended to have a PC with a general audience next to the host PC for constant monitoring. It is recommended that headphones be attached for audio confirmation to prevent sound leakage.
- The display on the host PC's screen and the online viewer's Zoom screen may actually be slightly different. While checking with the monitoring PC, try to use Zoom's "spotlight" function and other features to show the viewer the image as you expect it to appear.