Request for your cooperation in the survey
We are collecting user feedback (class members and students) to improve the usability/functionality of TMS. If you have time, we would appreciate your cooperation. (Response time: about 3-5 minutes)
Online Manual
video
Preparing...
illustrated (with photographs)
初めてTMSを使用する場合は、事前にZoomのURLを発行するアカウント(通常は授業者のZoomアカウント)で、Zoomポータルサイト(https://www.zoom.com/)にログインして、「設定」の「ミーティング」タブを開き、設定項目の「遠端カメラコントロール」をONにしてください。(設定項目が多数あるため、キーボードで Ctrl + F を同時押しして「遠端カメラ」と検索するとすぐに見つかります)
「遠端カメラコントロール」の設定は、一度ONにすれば、次回以降はこの操作は不要です。

If this operation is performed just before the start of the production meeting, the far end camera control ON may not be reflected. This phenomenon often occurs when a participant has entered the meeting before the host. In this case, the problem can be resolved by closing the meeting once and reopening it.
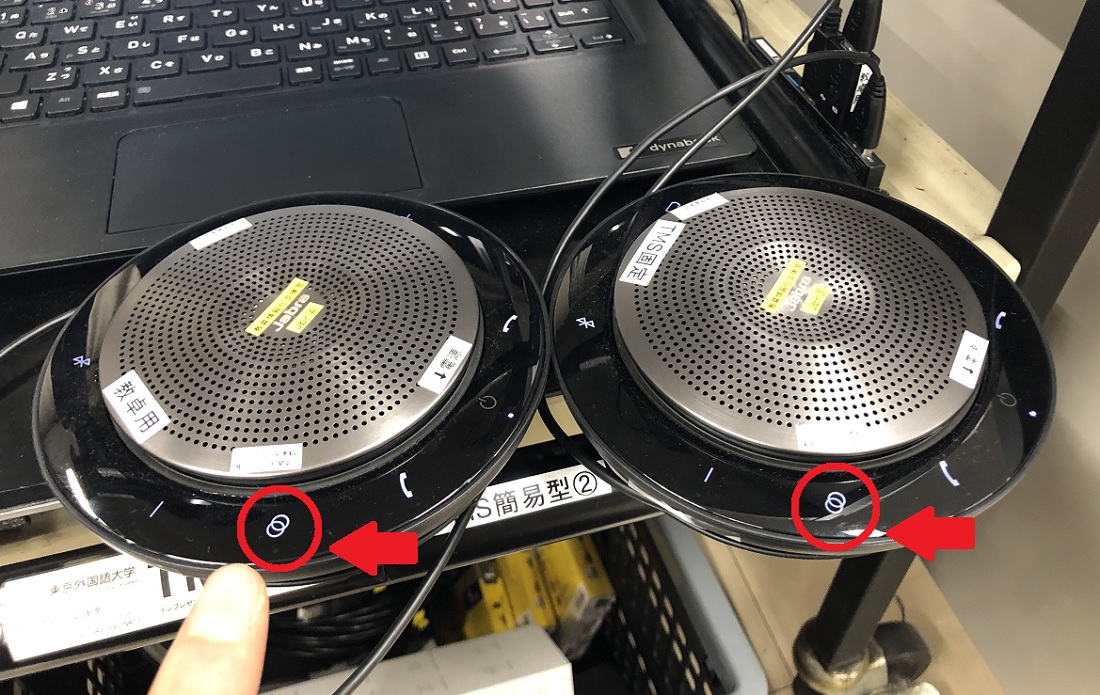
Turn on the two speakerphones (Jabra Speak 750 UC) installed in the TMS small and touch the respective "Link" icons. You will see a sticker that says "Link (2 units connected) ↓ Start Mutual Search". Mutual search will be started and the two units will be linked. When the linkage is completed, an audible "Linked" will be heard and the link icon will turn yellow.
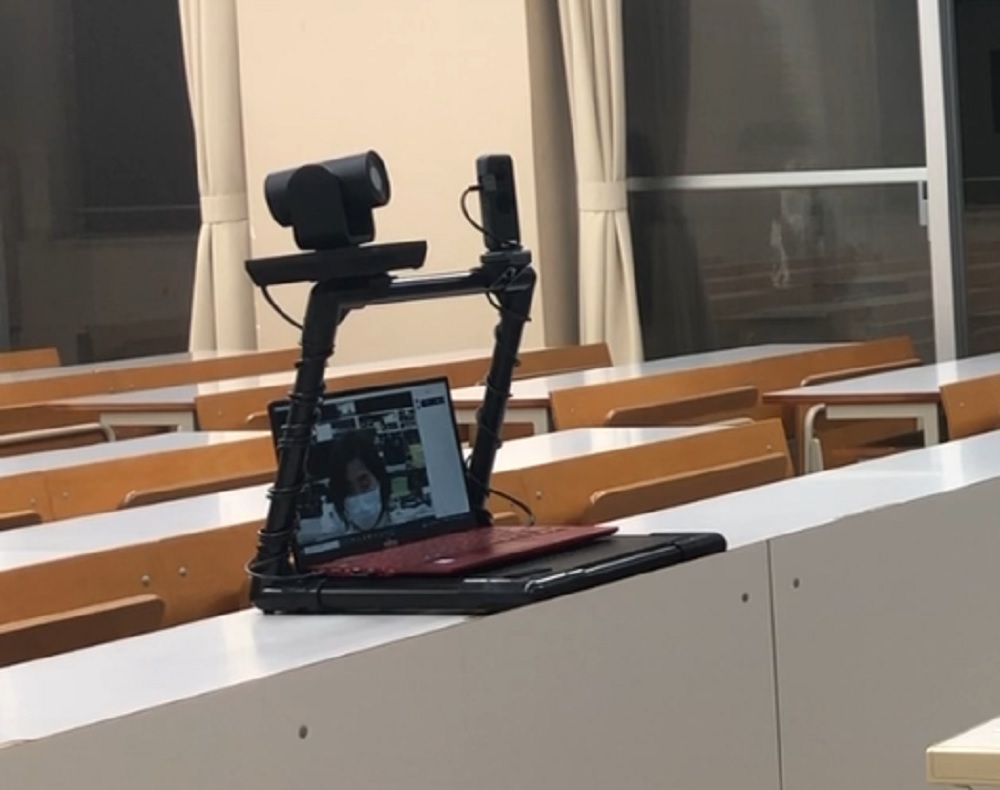
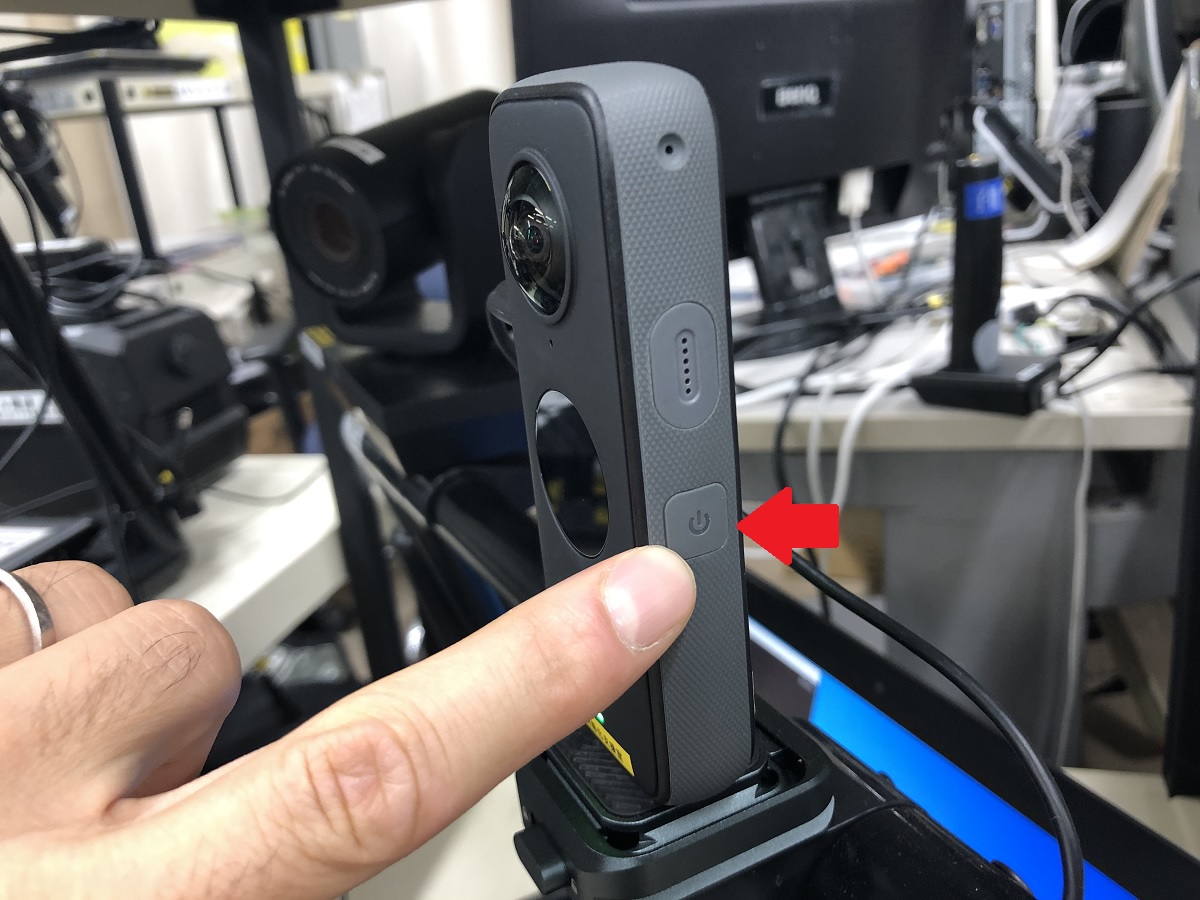
Turn on the 360° camera (Insta360 One X2) on the TMS small. The power button is located on the side of the camera body.
もしこの時点でまだインターネットに接続していない場合は、インターネットに接続する。(大学のWi-Fi、個人スマホのテザリングなど、何かしらのインターネットに接続できればよい)
Zoomアプリ、もしくはZoomポータルサイトなど、普段のやり方で、Zoomミーティングを立ち上げる。
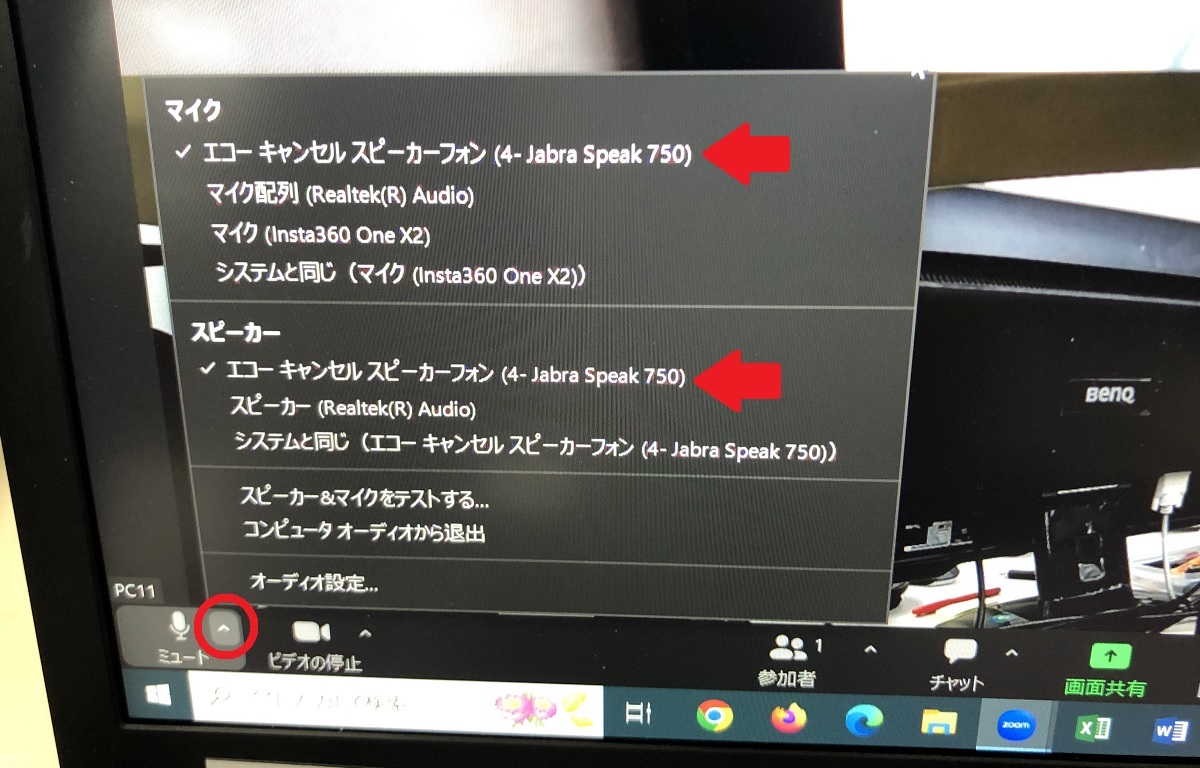
Camera: Select "USB2.0 Camera
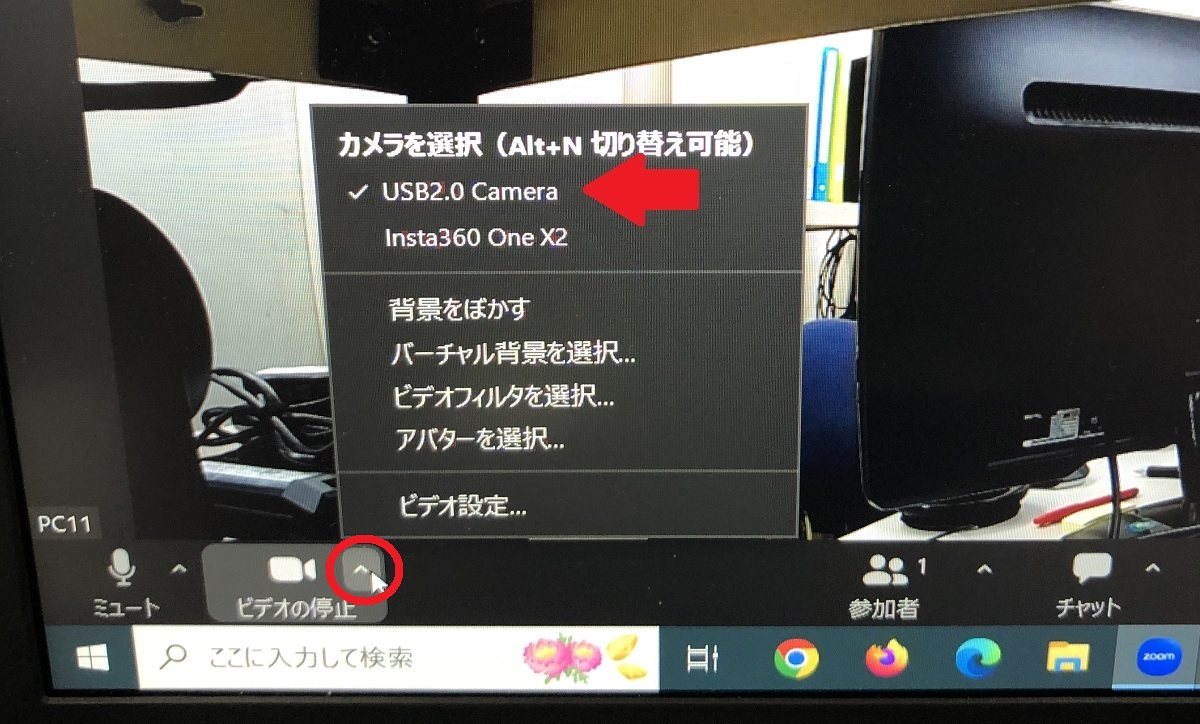
Microphone: Select "Echo cancellation speakerphone Jabra Speak 750
Speaker: Select "Echo cancellation speakerphone Jabra Speak 750
Make sure that the sound is coming out well, and also that your voice is coming back to you, and that it is coming back to you.
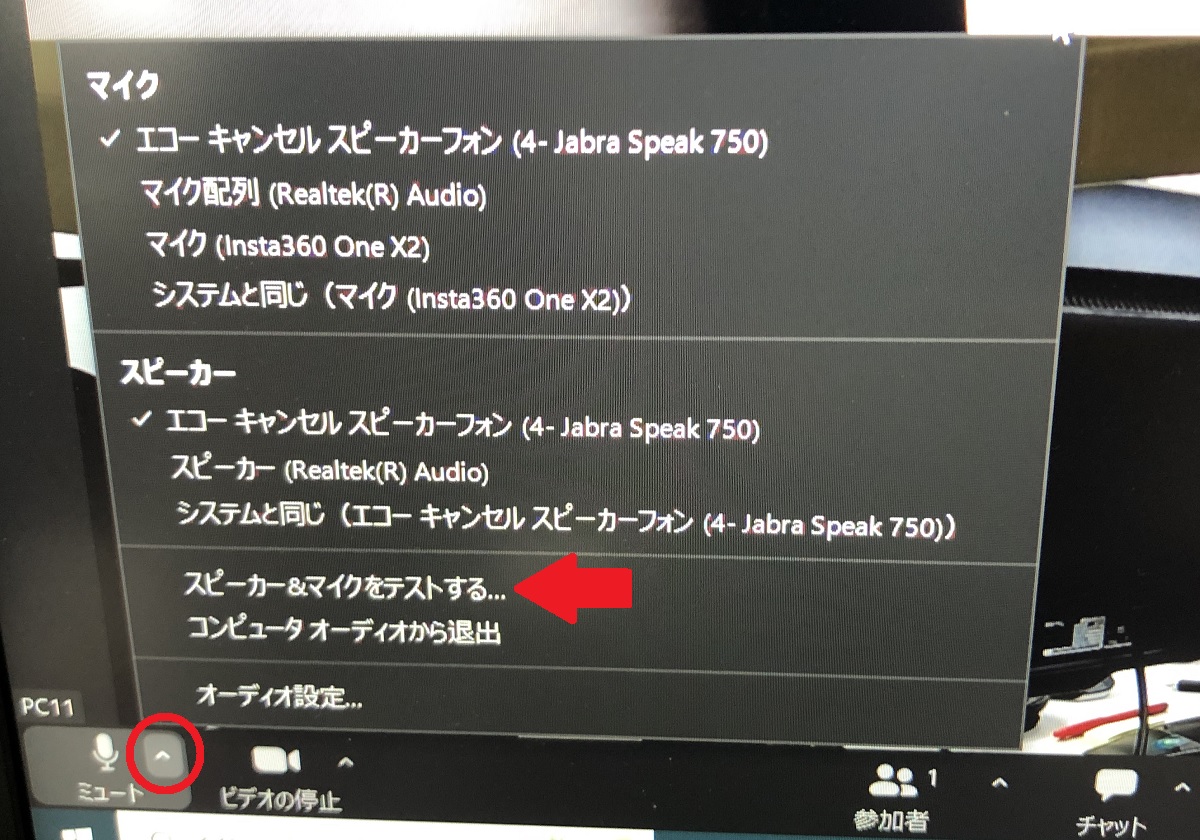
If you can hear your voice in this test, it means that the online side can always hear you as well, so if the online side tells you that they cannot hear you, it means that there is a problem with the audio environment on the online side, and not with the classroom side.
When the online side right-clicks on the screen of the classroom camera image, the option "Request Camera Control" appears and tells the online side to do so.
If the request is successful, the option to accept or reject the request is displayed on the TMS PC screen.
Try right-clicking on the classroom camera image. Several options should appear, one of which is "Request Camera Control". If no options appear, try right-clicking on the classroom camera image in another, smaller pop-up window.
Note that for smartphones, after touching "Participants", select a host among the participants and touch "Request camera control".
On the online side of the Zoom screen, you should see a crosshair and +- keys. Using these keys, you can remotely control the classroom camera from your home or other locations.
In addition, there should be a button at the top of the screen that allows you to switch between cameras. In the case of the TMS Elementary School, the classroom camera can be remotely controlled by a PTZ camera that can be oriented vertically and horizontally, zoomed in and out, or switched to a 360° camera, By switching to a 360° camera, it is possible to view all directions in the classroom at the same time.
The keyboard can be moved up, down, left, or right with the ↑↓←→ keys on the keyboard, and can also be enlarged with the "+ (le)" key and reduced with the "- (ho)" key.
A PTZ camera (USB 2.0 Camera) is useful when the on-campus side remotely teaches a regular class. Zooming in on a whiteboard or other small text will make it easier to read by enlarging the text.
The brightness of the PTZ camera image cannot be remotely controlled. If the light from the window is so bright that the whiteboard is blown out, please use the remote control of the camera in the classroom to adjust the brightness, etc.
It is also helpful to use a 360° camera (Insta360 One X2) if necessary. A 360° camera is more convenient for question-and-answer sessions and discussions, as it provides a full view of the surroundings. However, the 360° camera image cannot be moved up and down, left and right, or zoomed in and out.
If you have any problems using TMS during the course of your classes, please feel free to contact the Educational Informatization Support Office.
itemization
- Preparation (turn on far end camera control in the Zoom portal site)
- Linking of two speakerphones
- 360° camera activation (can be left off if not in use)
- Launch Zoom Meeting
- Camera: "USB2.0 Camera" selected
- Microphone: "Echo cancellation speakerphone Jabra Speak 750" selected
Speaker: "Echo cancellation speakerphone Jabra Speak 750" selected - Test speakers & microphone just to be sure
- Let the online side make a "camera control request" and "accept" it.
- Tell the online side how to remotely control the camera (using the cross-hair key at the bottom right of the Zoom screen or keyboard operation).
- Adjust camera as needed (adjust BRGHTNESS if white is skipped)
- ... and upwards